
Information:
Before configuring the assignment routing policy in Fullcast, it is important to set up Salesforce correctly to ensure your Fullcast account is synched properly. To do so:
Stages in Routing Policy
There are a number of stages that a Routing process goes through. Each stage can be switched on or off based on the requirement. Each of these stage is described below
Stage 1: Route using Best Matched Account (BMA) or Territory
This is the first stage in the Routing process. The BMA consists of a set of rules that help to identify an account as the best match account for a particular account or for a particular data. To enable BMA, the following steps need to be taken:
Switch on the Route using BMA or territory section. By default, the first option comes being enabled:
If an account cannot be matched, then match to territory. It means that if an account is not found for that lead, it will route leads using Territory-based routing.
If you do not wish to route through best-matched account even if it is available, then click on the check box: Ignore Best Matched Account even when available.
Warning:
Stage 1 -Route using BMA or Territory and Stage 3- Auto Convert is applicable only for Lead and Account Routing.
Stage 2: Dealing with Duplicates
When you decide to find the duplicate switch the Dealing with Duplicates section to ON mode.
Set the criteria for finding duplicates - type in how many days between each check is made for duplicates and by what percent they should be matched.
Now, decide whether to Do Nothing, Route or Merge the duplicates. If a duplicate is found, then you can
Do nothing and leave it as is.
Merge it with the original
Route to the same owner as the original.
If contact is found matching this lead, then you can choose to
Do nothing with the duplicates
Route to the contact owner
Convert and Merge with the contact owner
If a duplicate from the same clean domain field is found, then
Do Nothing and leave it as is.
Route it to the same owner as the original.
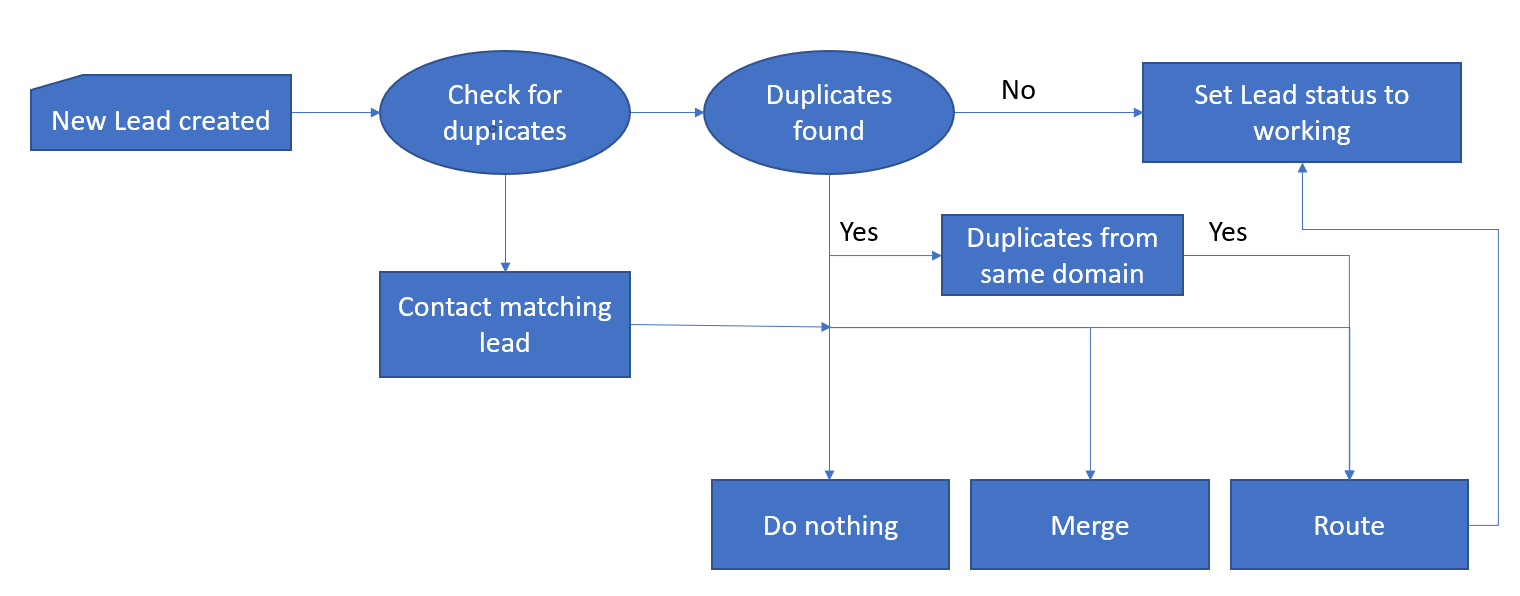
Figure 1. Flow
Stage 3: Auto Convert
In the Auto Convert stage, you define specific criteria to convert leads to contacts or accounts automatically. The criteria should match either with the Lead or with the Account.
Auto convert leads to contact matching the following criteria on - if you pick Lead from the dropdown, the criteria described below this should match with the lead. If the criteria is satisfied by the lead, it is going to convert to a contact.
If the criteria is not matched, then you can choose to Do Nothing. Or you can choose to create a contact from the lead by selecting Create from the dropdown.
Auto convert leads to contact matching the following criteria on - if you pick Account from the dropdown, the criteria described below this should match with the Account. If the criteria is satisfied by the Account, it is going to convert to a contact.
Note: When an account is selected for matching, it goes through the process of Best Matched Account to find the best-suited account for matching.
If the criteria is not matched, then you can choose to Do Nothing. Or you can choose to create a contact from the account by selecting Create from the dropdown.
Stage 4 - Role-based Routing
If you'd like to route incoming cases to people in roles on an existing account team, you can do so in this stage. For example, you can send leads to an SDR team if the company is a prospect but send it to an account manager if the account is already a customer.
Switch the Role-based Routing section to ON mode
If the lead is matched to an account then we can route to the account owner on the matched account.
If you don't want to route it to the account owner, you can route it to some other person who fulfills the criteria set by you. To select a person based on the criteria, select the option based on the criteria.
In the section that opens, pick a field that needs to be matched in the account.
Give a corresponding value according to the field selected and assign it to the person in a particular role from the drop-down menu available.
You can add more criteria clicking the grey [+] button in the top right corner of stage 3.
Stage 5 - Round-Robin
(For users using version 2.160 and above please click this link Round-robin functionality for package version 2.160 and above to work with this stage. Other users can follow the below steps)
Refer Round-robin functionality to know about the factors affecting round-robin functionality in Fullcast.
If you would like to assign incoming opportunities to a team of Sales Development Reps, you can enable round-robin distribution to make sure that your salespeople are getting equal workloads. This can be combined with any of the stages above to optimize the allocation of work to the various teams and roles.
Add Participants to assign incoming cases in a round-robin fashion. Select the + icon from the top right corner of the Round robin section. Select the participants from the drop-down available.
After selecting the participants we can manage and specify certain fields which would help in routing it to the specific person. If a person is given more value in the weightage column, then the person gets routed with more number of cases. The number of cases routed to the person depends on the weightage given to the person in the weightage field. If everyone gets the same value then every person gets equal share of the leads.
Add a Skill to filter against if you'd like to assign a specific person to a case. (E.g., French-speaking SDRs can be assigned to opportunities based in French-speaking countries by adding "French" as a skill)
The vacation details of the person, can be managed by selecting the manage icon after saving the participant by selecting the save icon against the name of the participant.
The status column helps us identify whether the particular person is active or inactive to handle the particular case.
If you'd like to set a limit on the number of cases routed to ANY participant, you can use the Limit column to do that. The limit can be set on Hourly, daily and personal limit basis. Once the set limit is reached for the particular person the opportunity gets routed to the next eligible person.
Additional configuration in the Round-robin stage
Additional configuration in the Round-robin stage enables more filter criteria and easy execution of the routing.
Check the box if you want to skip the round-robin stage when there are no matching skills found. This will help to go directly to stage 4- Defaults and record tagging.
If you wish to have the support from the agent for round-robin routing, you can have it by checking the box which says *Support Agent login for Round-robin routing
When there is more number of cases created, we can set a maximum limit of cases that needs to be distributed to the representatives by checking the box Limit the total number of cases routed to anyone to a maximum of.
Stage 6 - Defaults
If you would like to set a default user or queue to send incoming cases to, you can do so in this stage.
From the drop-down menu, select whether you would like to send incoming opportunity to a default user or queue.
In the next line, select a user from the drop-down menu or type in the queue name to route the case.
Select the fields that needs to be updated on the case.
If you do not want the user to update the owner field, select the check box "Don't update the Owner field"
Notifications
To send notifications to users when incoming cases are routed, fill out this section.
Check the box titled Send notification of routed cases to the new owner via Salesforce Chatter.
You can customize the text that you wish to send along with the notification. This can be done in the Additional Text section.
If you'd like to send notifications to another person besides the new owner of the case, choose a person from the drop-down menu.
When finished with all sections of the policy, make sure to select Save Changes when finished.