Use the Fullcast change owner lightning action in Salesforce.
Use the change owner button
Log in to Salesforce Lightning.
Click Accounts.
Select the accounts you want to change the owner on.
Click Change Owner.
.png?sv=2022-11-02&spr=https&st=2026-05-25T21%3A34%3A10Z&se=2026-05-25T21%3A45%3A10Z&sr=c&sp=r&sig=kofr7nSYNssETQ3khp1nDLkcYjewRaz4R1BuJLBTpIc%3D)
On the Change Account Owner screen, from the first dropdown, select one of the following assignment types:
User: Defined by the specified roles.
Territory: Limited to those visible to the user.
Use the search bar to select a user or a territory name.
Select an option on how you want to treat the children of the parent accounts you're moving:
Option
Description
Do not reassign child accounts to the same segment
Child accounts retain the existing owner.
Assign all child accounts to the same segment
Reassigns all child accounts to the new owner.
Assign child accounts that match the following criteria to the same segment as the parent
Reassigns child accounts that meet specific criteria to the new owner.
Group all accounts belonging to the same corporate family into one segment
Groups accounts that belong to the same corporate family for consolidated ownership.
Select to change the named type status for the moved accounts:
Option
Description
Do not set a Named Type account status
Does not change the named type status.
Set moved account as a Named Account
Marks accounts as a Named Account and changes any accounts marked as Named Exception to Named Account.
Set moved account as a Named Exception
Marks accounts as a Named Exception and changes any accounts marked as Named Account to Named Exception.
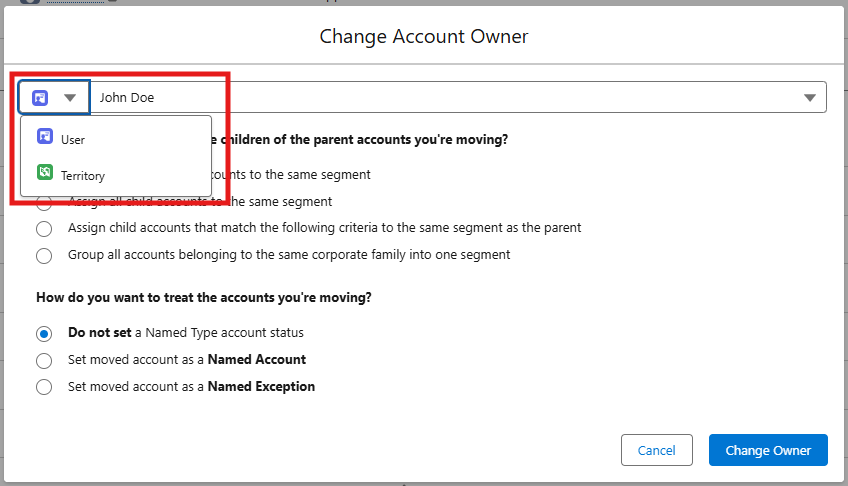
Click Change Owner.