This article provides information and directions for importing territory coverage assignments in bulk to Fullcast via CSV file. By completing this article you will have:
Downloaded territory structure from Fullcast to obtain node_id
Created CSV with appropriate fields
Input coverage assignment details
Contacted customer support contact to upload the CSV
Information:
Fullcast validates the CSV file to ensure all required information is present and accurate, including node IDs, people IDs, and ramp profiles. If any errors are detected, they are logged to an error file for easy review.
CSV File Format

Figure 1. Column Headers and CSV Format
Figure 1 displays the format in which the CSV file is downloaded and must be followed for a successful import.
Warning:
The column headers in your CSV file must mirror those illustrated in Figure 1. These columns are listed in the Column Header column in the following table.
Column | Column Header | Description |
|---|---|---|
A | plan_name | This is the title of the plan you want to import assignments to. To locate your plan name, log into your Fullcast instance. Your plan name can be found in the top left corner. If you need to switch plans, click the Switch Plans button in the top right corner below your avatar. |
B | gtm_type | There are three types: Territories, Teams, and Products. If you’re importing assignments to territories, for example, you would use segments. |
C | node_id | You can find your node_id by exporting your territory data to a CSV file. Open the file and your node_id will be column A, ID. See Figure 3. |
D | start_date | The start date of the assignment. |
E | end_date | The assignment’s end date. |
F | role_name | The role of the user. Account Executive for example. |
G | people_id | This unique identifier is found in the Teams grid. Navigate to Team Organization on the Teams tile and export the table to obtain your people_id. The people_id will be the column titled “Identification.” |
H | assignment_type | The assignment types available for bulk import are Normal, Temp. Refer to the Creating Normal and Temporary Assignments article for more information regarding assignment types. |
I | producitivity_profiles_name | The name of the productivity profile used for this assignment. For example, Fully Ramped - the name of the productivity profile used for the Account Manager role. |
Export Territories for Node ID
To find your node_id follow these steps:
Access your Fullcast instance and switch plans if applicable.
Information:
The plan name is a required field (column A) in the CSV file.
Click Manage Accounts on the Territories tile.

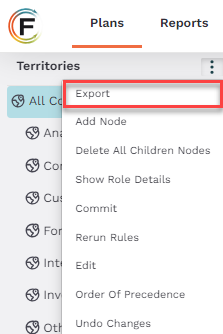
Figure 2. Export Option
Click the More Options icon (three vertical dots) and select Export from the dropdown menu.

Figure 3. CSV Id Column
Open the CSV file and locate the “Id” column (column A). This is your node_id. Copy and paste the information into the CSV file you’re creating as appropriate.
Warning:
Formatting must match exactly for the import to be successful.
Complete your CSV file with the remaining information.
To find your people ID:
Access your Fullcast instance and switch plans if applicable.
Information:
The plan name is a required field (column A) in the CSV file.
Click Manage Coverage on the Territories tile.
Click the More Options icon (three vertical dots) on an existing assignment and select Edit to view details, or click Create New to create a new assignment.
To locate your assignment type, role, productivity profile, and start and end dates:

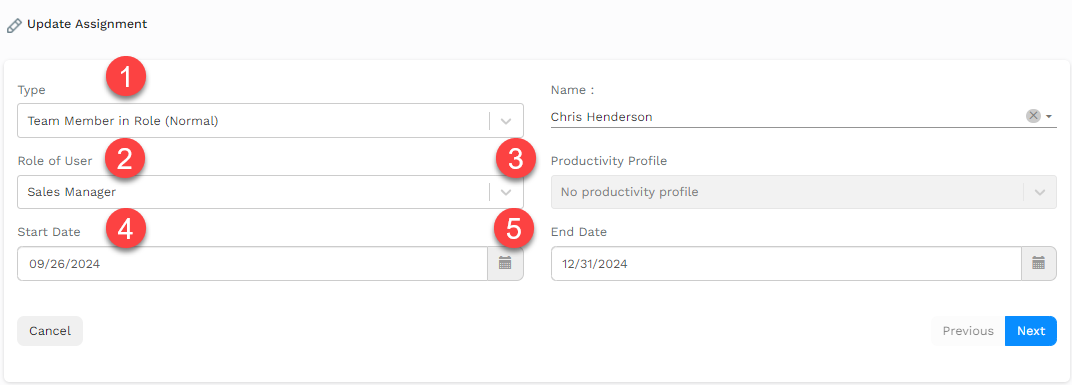
Figure 4. Assignment Fields
Figure 4 calls attention to the location of the:
Assignment Type
Role
Productivity Profile
Start Date and End Date
This information is found in the Coverage tab under existing assignments or when creating a new assignment. For more information on coverage, see the appropriate articles.
Uploading CSV File
Currently, uploading the CSV file is a backend process. Reach out to your Fullcast customer support team to request the upload.
Warning:
Uploading your CSV file is a one-time occurrence and must be completed with a Business Partner.
Where can I find my people_id?
Your people ID can be found in Teams. Click Team Organization on the Teams tile and click the export icon (pdf) to export the Teams table. Open up the download and your poeple_id will be the content in the identification column.
Where can I find the names of productivity profiles, roles, and assignment types?
To view productivity profile names, roles, and assignments, navigate to the coverage tab, click the More Options icon (three vertical dots), and select Edit to view the appropriate coverage. Alternatively, click the Add New button to create a new assignment.
Is there a separate table available to download people's names and IDs?
Yes. Download your Teams table to view people IDs and their corresponding names.
Can I download a list of options for fields like productivity profiles, role_names, and assignment_types?
Not at this time.
If multiple productivity profiles exist, do I need to remember the exact format and spelling of their names?
Yes. Your data must follow the exact formatting for the import to be successful.
Can I make changes to the CSV data such as swapping out productivity profiles or adjusting other field values? What are the limitations and restrictions?
You can make changes to the data within a cell but the formatting must match exactly for the import to be successful.
