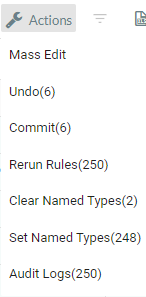
When you select records and click on the Actions tab, it enables a different set of actions for those records. Below is a list of actions available through the Actions tab.

Figure 1.
How to use Mass Edit?
How to Use Mass Edit:
Choose the records you want to edit.
Click the Actions button and select Mass Edit.
A pop-up window appears, prompting you to select the field from the dropdown menu and enter a value.
To edit more custom fields, click the green plus icon in the pop-up window to add columns.
If there are no editable fields configured, you receive an error message and won’t be able to perform the mass edits. Only a limited number of editable fields can be configured, and these fields cannot be imported from your data source.

Figure 2.
Saving and Undoing in Custom Fields
Use the Save icon to save any in-line edits made to a custom field on a record.
Use the Undo icon to revert any in-line edits made to a custom field on a record.
Make in-line edits to customer fields in the Details Grid.
Select the Save or Undo icon to confirm changes.
Steps to Rerun Rules Using the Actions Button
Select the records you want to rerun rules for.
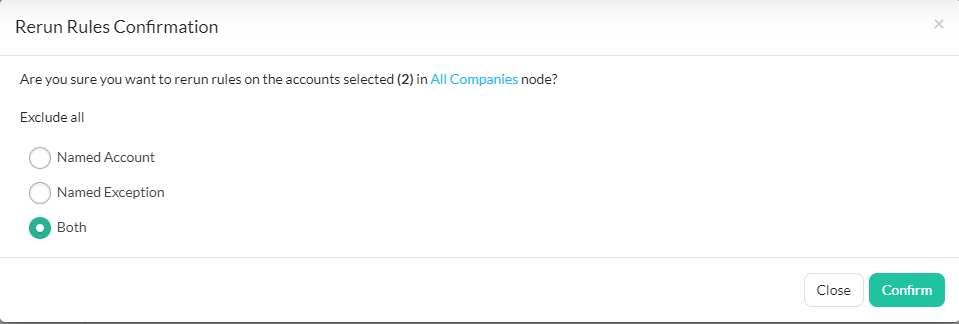
Click the Actions button and select Rerun Rules.
A confirmation window will appear asking if you want to rerun rules for the Named account and Named Exception. Select accordingly and confirm.
The process may take time depending on the number of records affected.

Figure 3.
Set/Clear Named types through the Actions button
Select the appropriate records and click the Actions icon (wrench).
Choose Set Name Type from the dropdown menu.
In the Set Named Type dialog box, select the applicable named type from the dropdown menu.
Click Confirm to set the named type for the selected accounts.
To remove a named type, select the relevant records, click the Actions icon (wrench), and choose Clear Named Types.

Figure 4.
Select the records you want to change as Named Type.
Steps to commit changes using the Action button
Select the applicable records and click the Actions icon (wrench), then choose Commit.
A confirmation window will appear asking you to enter CONFIRM (case sensitive) and click Confirm.
