RevOps teams and Sales leaders may want to collaborate on account management, such as coordinating accounts moves between territories. In Fullcast you can accomplish this by using the Notes functionality. This allows you to create notes and assign them to other users. Notes can trigger notifications, alerting a user to review the note.
This article provides instructions for configuring and using account notes and notifications.
Overview
For a note-driven collaboration process to work, the following configuration for notes and notifications must be in place:
Relevant Roles must have appropriate read/write permissions for collaborating with notes
Notifications must be enabled in your Fullcast tenant
Individual users must set up their notification preferences
Once configured, users can leverage the following notes functionality:
Create notes
Assign users to notes
Comment on note threads
Edit assigned users
Resolve notes
Create additional note threads
Configure Notes and Notifications
To receive notifications for account notes, you must first configure permissions and notification preferences.
1. Set Role Permissions for Collaborating with Notes (Tenant Admin)
Tenant administrators must grant the necessary permissions to roles that need to use account notes. To do this, follow the steps below.
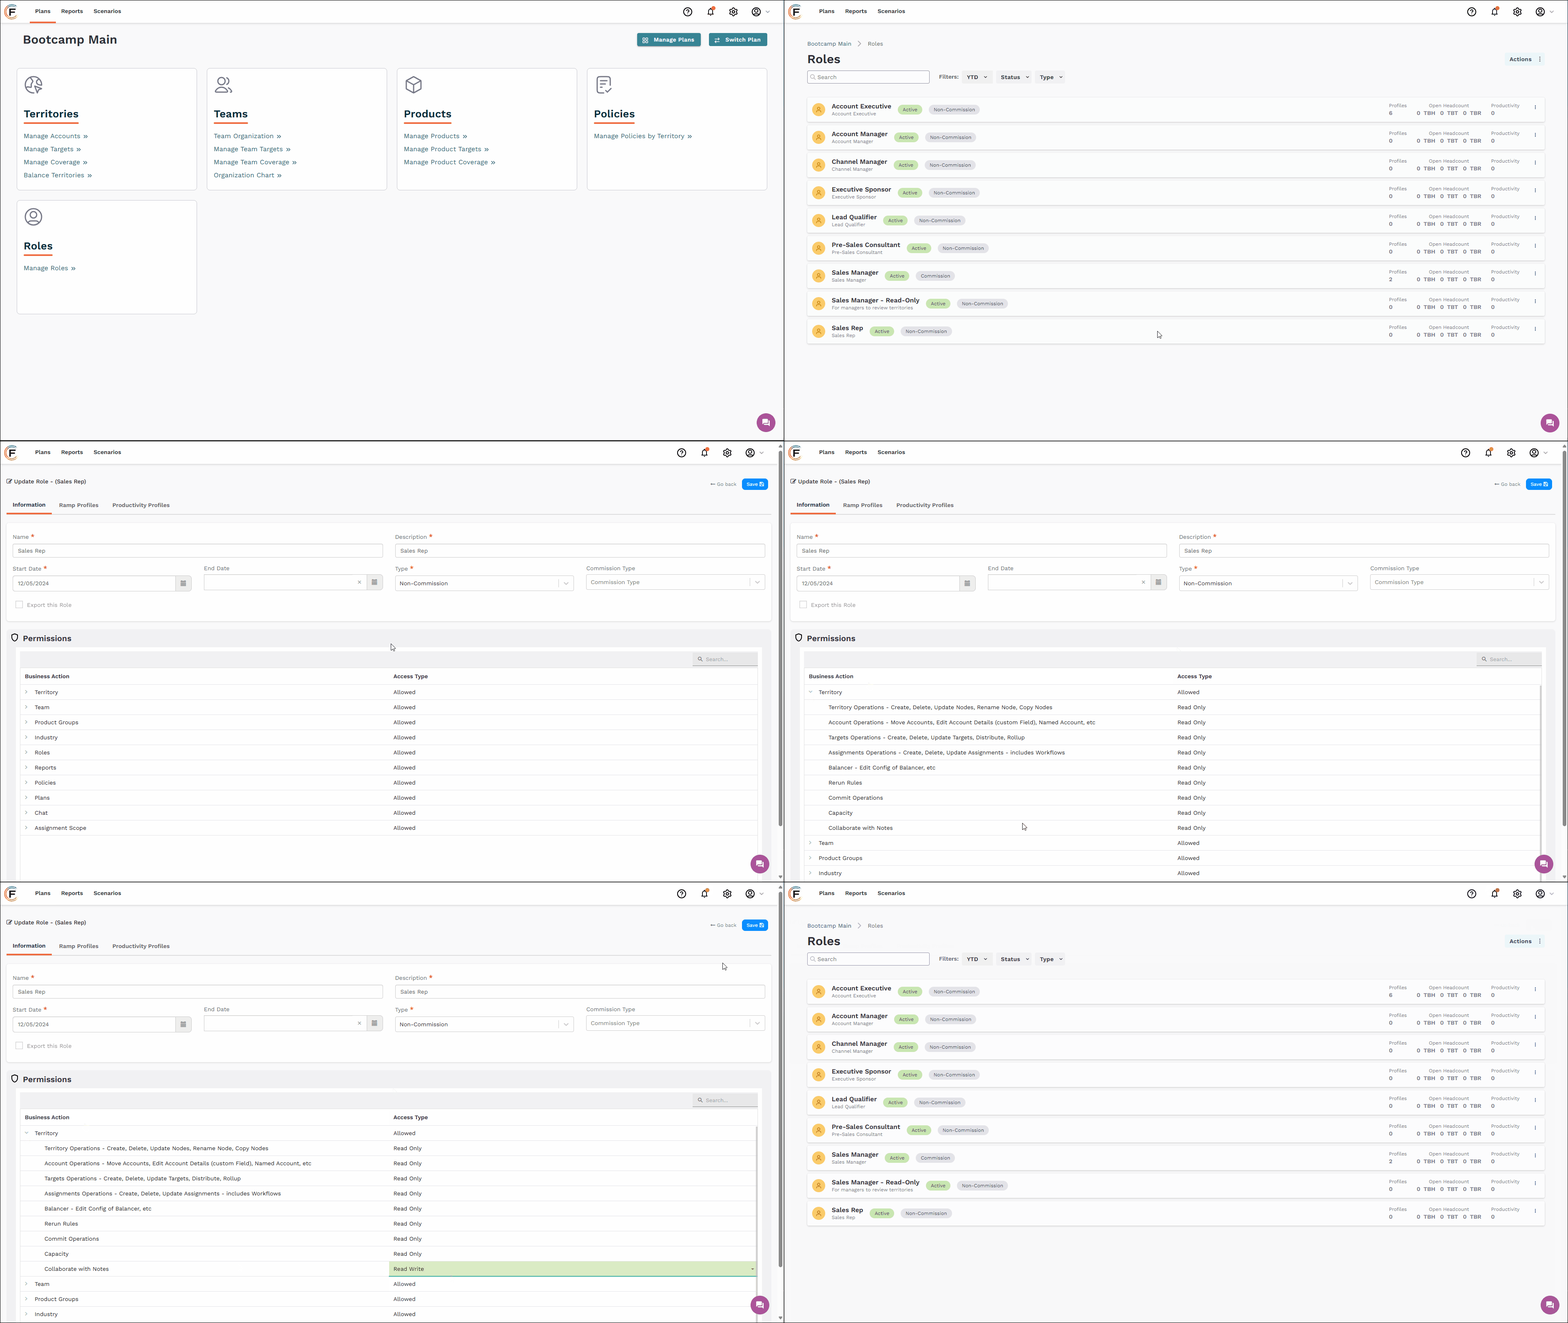
Setting role permissions to allow for read/write of account notes. (Click the GIF to enlarge it.)
Navigate to Role Permissions for Territories:
Access your Fullcast instance and ensure you’re in the correct plan
From the Plans screen, find the Roles tile, and click Manage Roles.
Find the desired Role, click the three-dot on the right side, and click Edit
Set Read/Write Permissions for Notes:
Under Permissions, expand the Territory section.
Find the line for Collaborate with Notes.
Select Read/Write to enable users in this role to create and modify notes.
Repeat for All Roles:
Repeat steps 1 and 2 for all roles that require access to account notes.
2. Enable Notifications Feature for Tenant (Tenant Admin)
Tenant administrators must request to enable notifications for the entire Fullcast instance.
Submit a Request: Send an email to customersupport@fullcast.com requesting to enable account note notifications.
Verify: Once notifications are enabled in your tenant, you will see a bell icon in the upper right corner
3. Configure User Notification Preferences (All Fullcast Users)
Individual users must configure their notification preferences to receive account note notifications. To do this, follow the steps below.
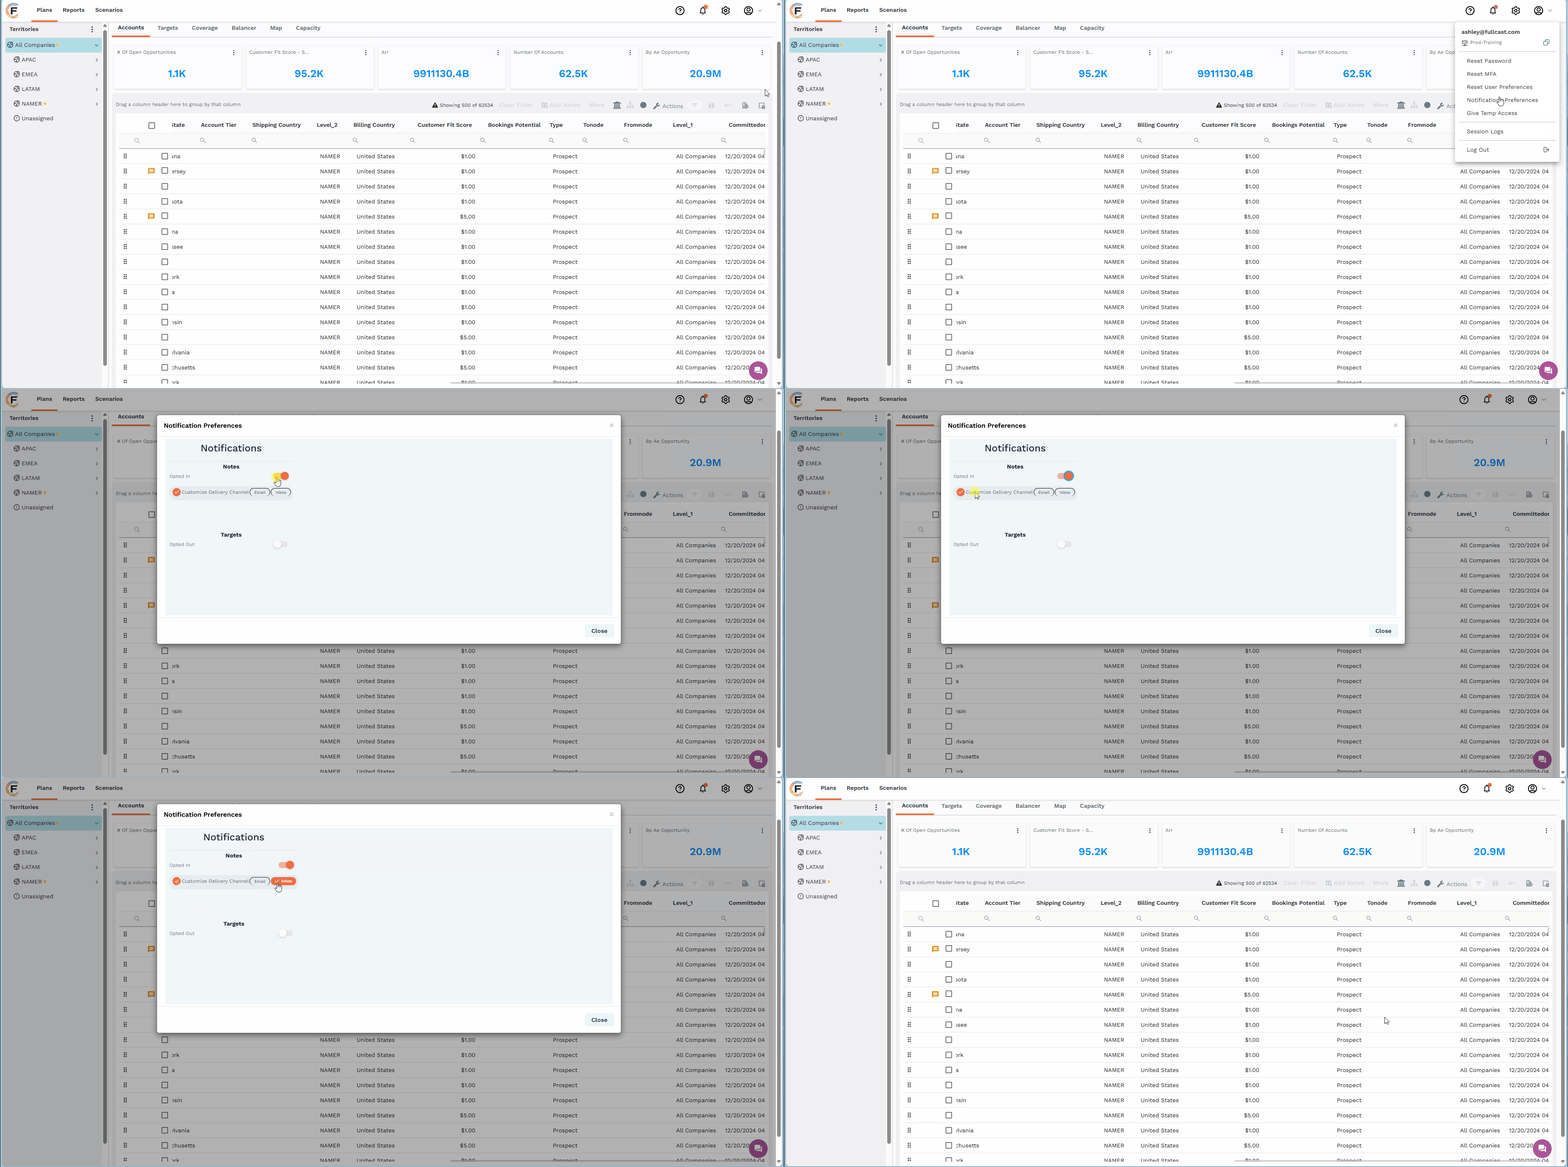
Setting user notification preferences. (Click the GIF to enlarge it.)
Access Notification Preferences:
Click on your User Avatar.
Select Notification Preferences.
Enable Note Notifications:
Find Notes in the list of notification categories.
Toggle the switch to Opted In.
Customize Delivery Channel:
Select your preferred delivery metho.:
Email: Receive an email for each note assigned to you.
Inbox: Receive an in-app notification in the Fullcast app for each note assigned to you.
Use Account Notes
Once notifications are configured you can create, comment on, search for, and resolve account notes. To do this, follow the steps below.
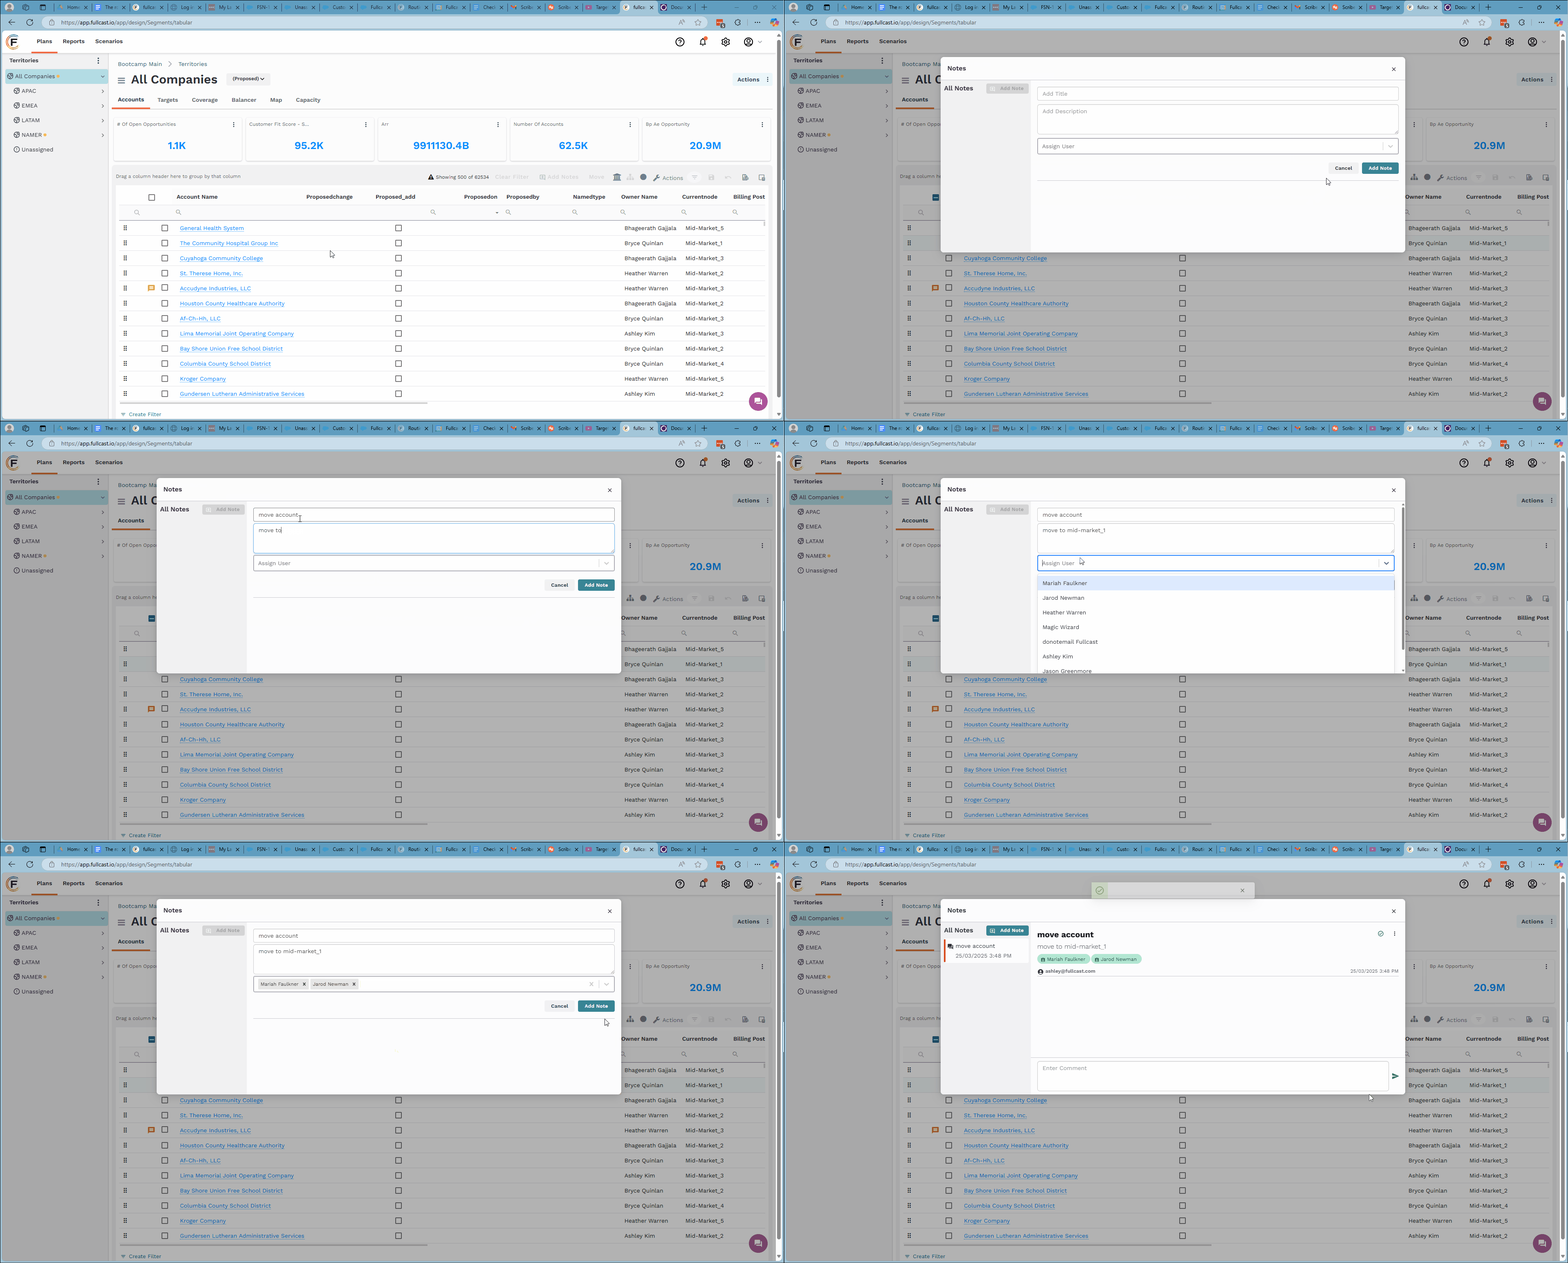
Creating a note on a new account, inputting the text, and assigning a user. (Click the GIF to enlarge it.)
Create a Note and Assign Users
Find the Account:
Find the desired account in the account grid.
Select the Account:
Click the checkbox on the left side of the account row.
Add a Note:
Click Add Notes in the header of the table.
Fill in Note Details:
Enter the Note Title.
Provide a Description.
Assign Users as needed.
Reminder
Users will only receive notifications for assigned notes if they have configured their user preferences as described in Configuring User Notification Preferences above.
Comment on a Note Thread
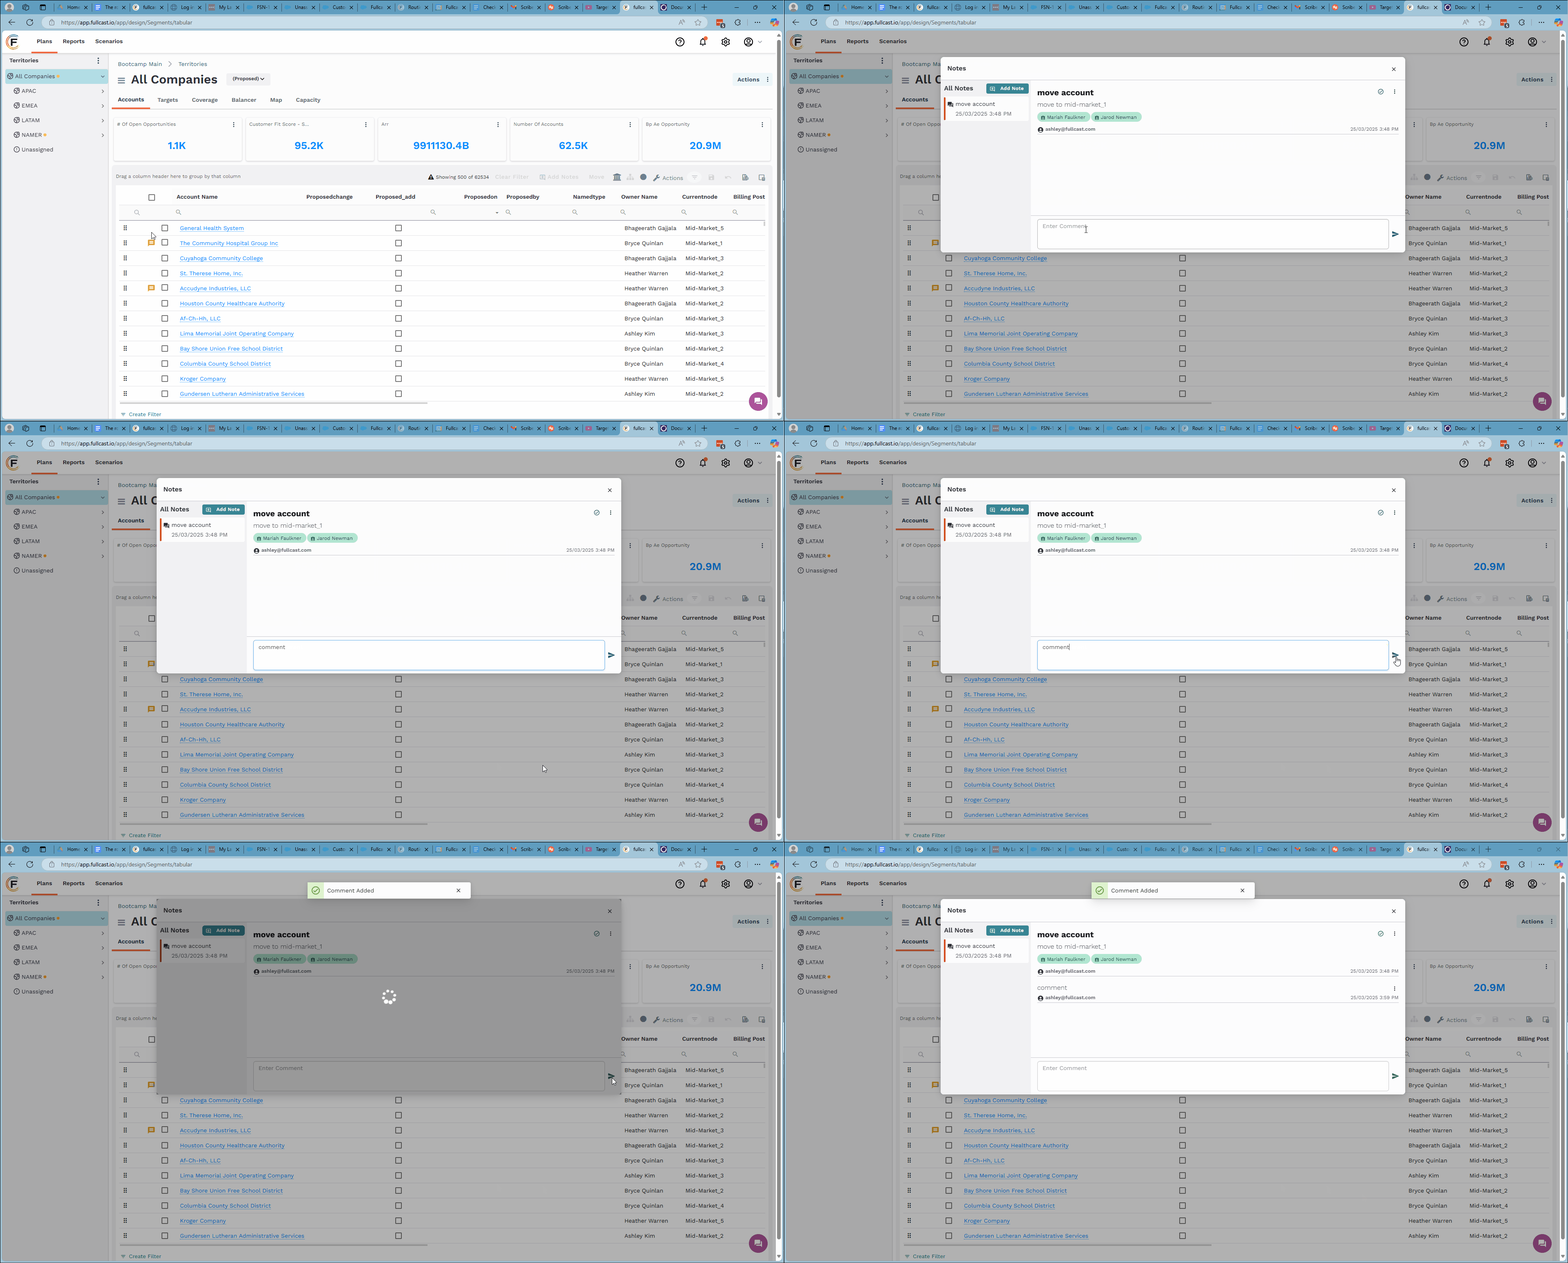
Opening an existing note and adding a comment. (Click the GIF to enlarge it.)
Open Note: Click the Gold speech bubble icon on the account grid to open the note.
Add Comment: Type your comment and submit it.
Edit Assigned Users
Open Note Modal: Click the three dots at the top of the Notes pop-up modal.
Edit Details: Make the necessary changes to the note or assigned users.
Resolve a Note
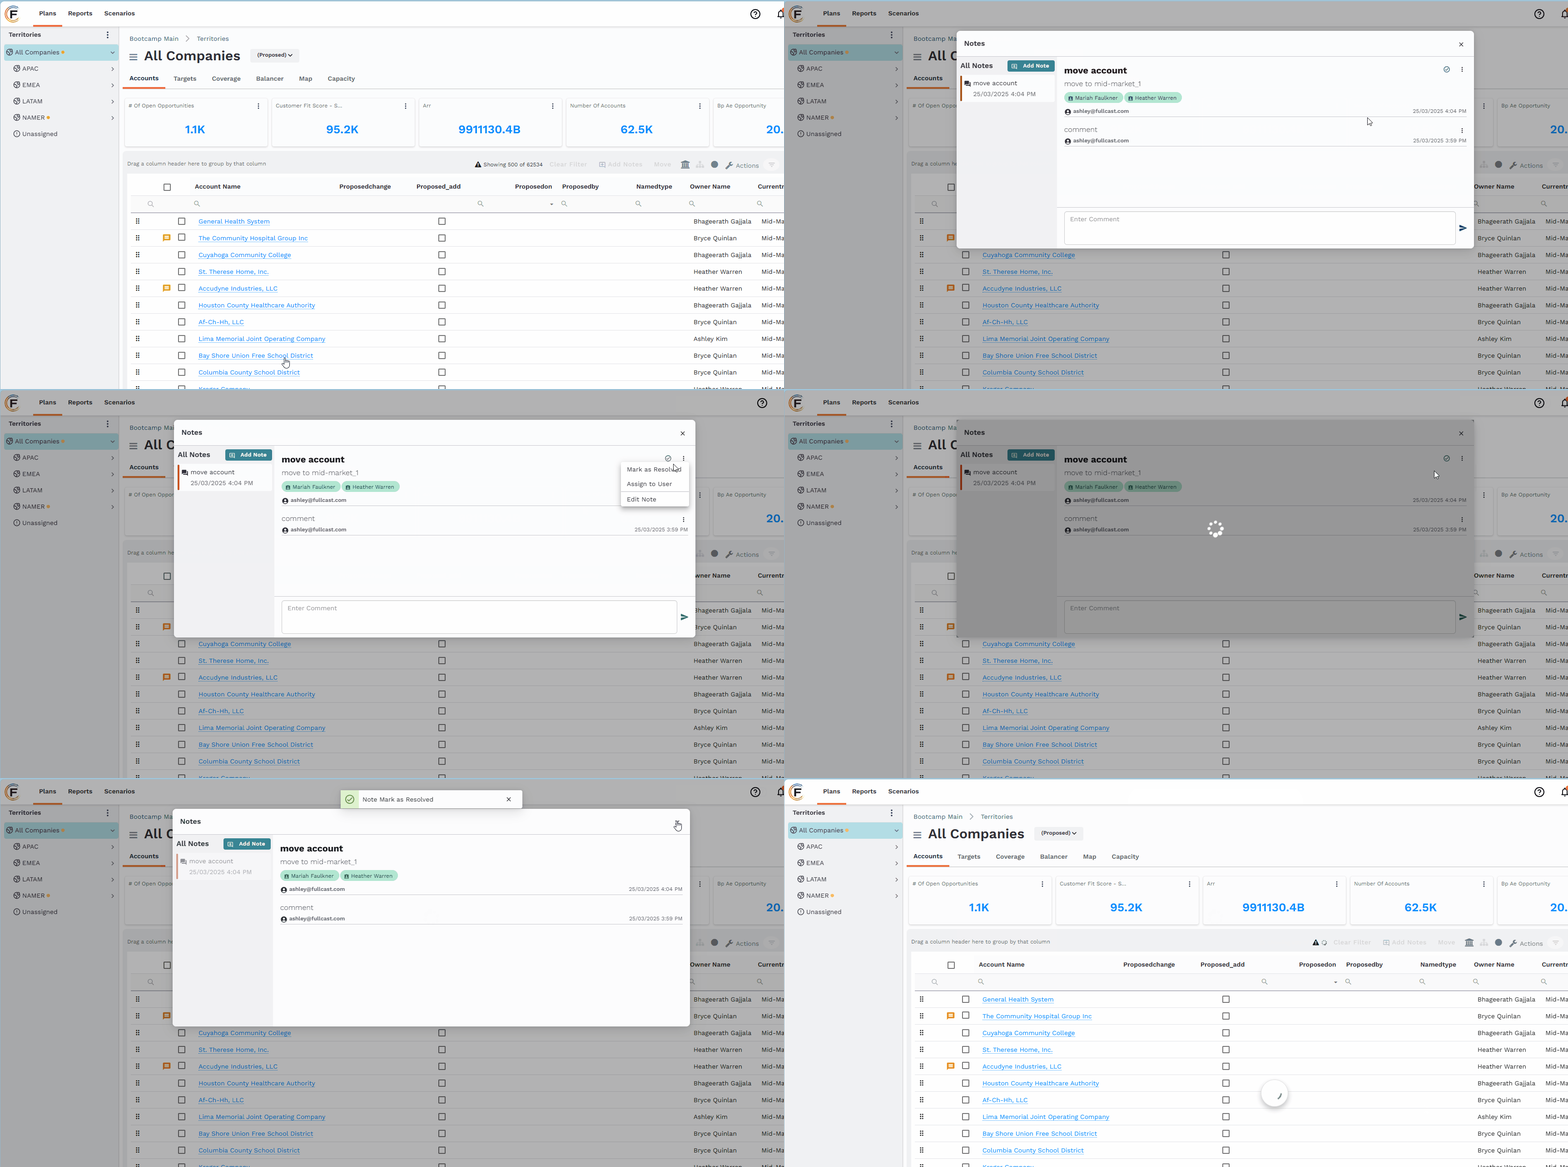
Resolving a note. (Click the GIF to enlarge it.)
Click the three dots at the top of the Notes pop-up modal and select Mark as Resolved.
Alternatively, click the circle check mark.
Note History
Once a note is resolved, it cannot be edited or re-opened. However, the conversation history remains visible. From within the note modal, click “Add Note” to create a new conversation thread.
Search for Notes
You can search for note text within the account grid.
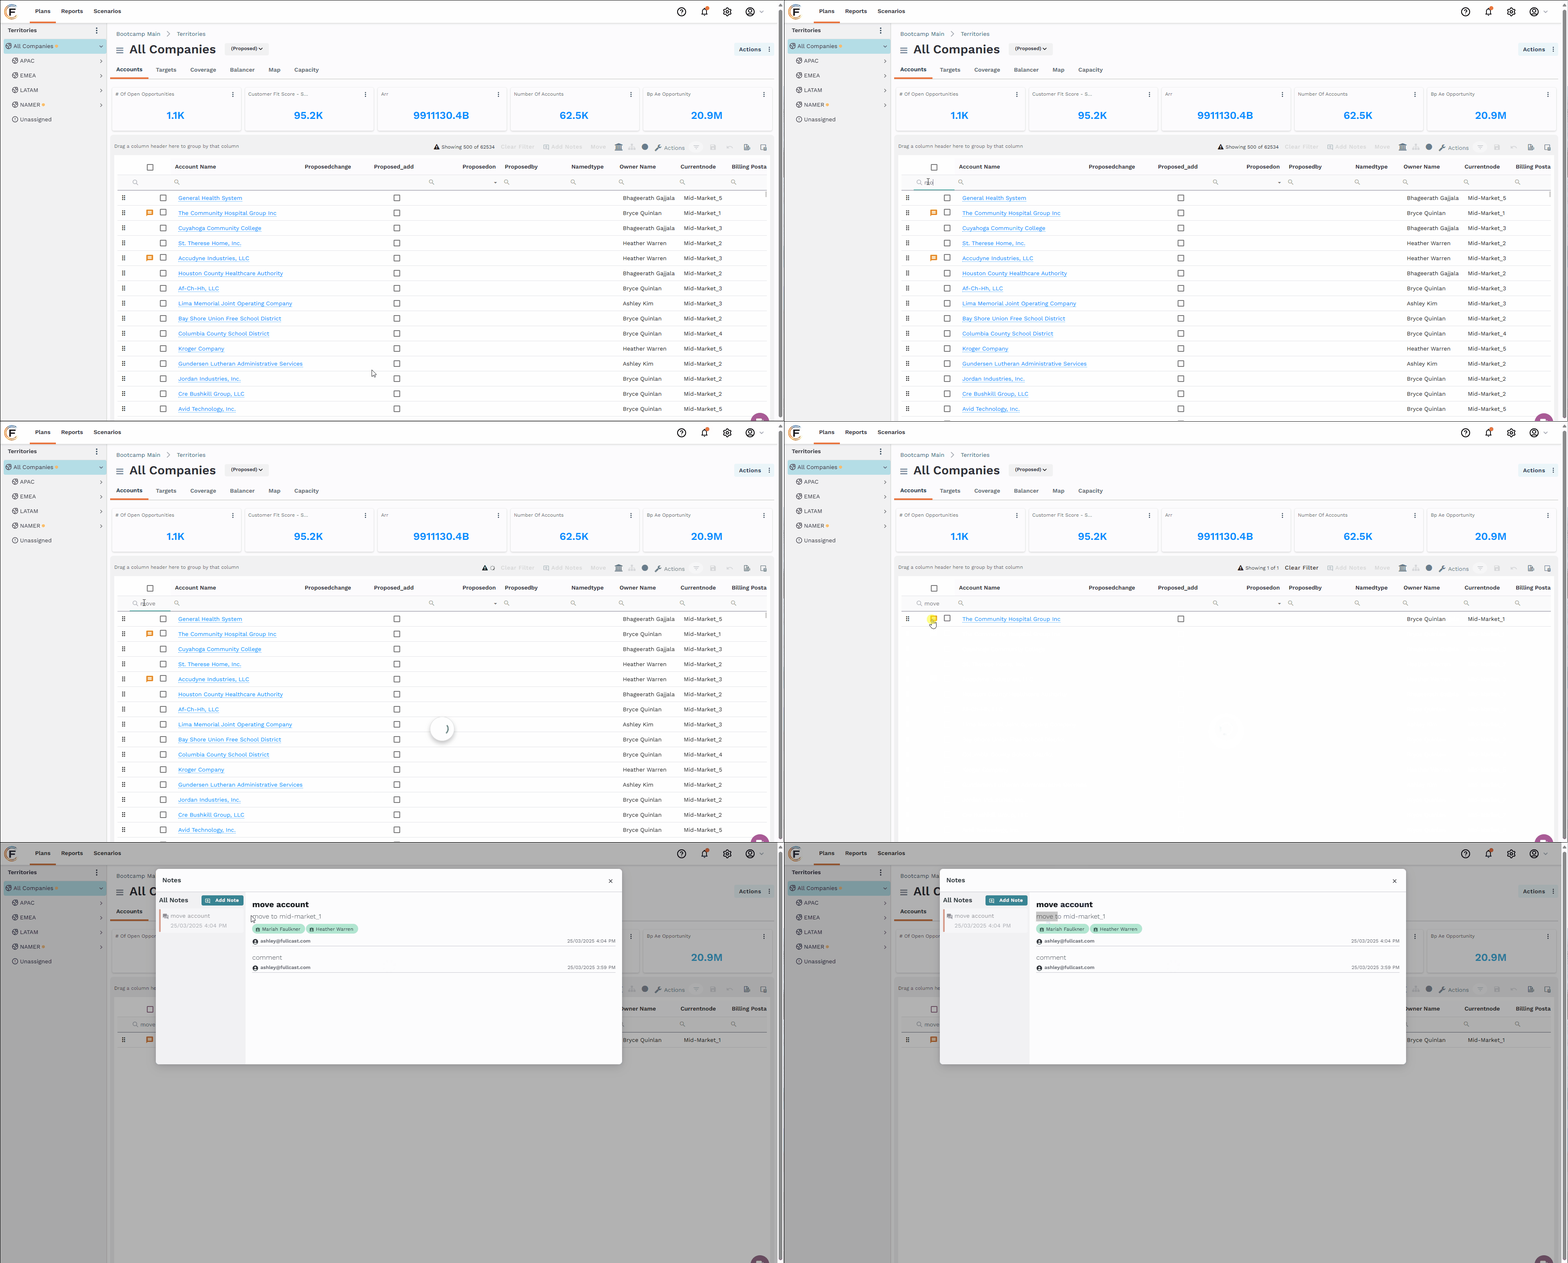
Searching for a note by entering text. (Click the GIF to enlarge it.)
Navigate to Territories > Manage Accounts
Access search field by navigating to the header row, going to the left side, and clicking into the field next to the magnifying glass icon.
Type the text you want to search for.