Configure Single Sing-On (SSO) with Fullcast using a SAML 2.0 Identity Provider (IdP).
Note
IdP-initiated Single Sign-on is not supported.
Supported features
Service provider (SP)-initiated only: You must first login to Fullcast to begin the SSO login process. The SSO app panel can use a bookmark app to allow login from the app
directory.Just-in-Time (JIT) provisioning: Fullcast supports automatic user provisioning upon initial login through SSO.
User access management: User access within Fullcast is managed through the Fullcast user management settings panel.
System for Cross-domain Identity Management (SCIM) provisioning: Automates the exchange of user identity information between Fullcast and your IdP.
Before you begin
Login to your IdP: You must be logged in so you can update the settings for SSO with Fullcast.
Tip
Log in to your IdP in a separate tab or window so you can complete the configuration with Fullcast simultaneously.
Copy your domain URL: Your domain URL is required to configure SSO in Fullcast.
Configure SSO
Access your Fullcast instance.
Go to Settings > Users > Settings.
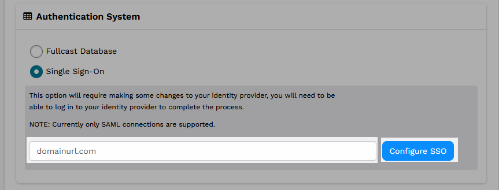
Under Authentication System, select Single Sign-On.
In the field, paste your domain URL.
Click Configure SSO.

In the Configure Single Sign-On window, click Get Started.
Select Custom SAML then click Next.
.png)
Create an application
On the Create an Application step, copy the Single Sign-On URL and paste in corresponding field in your IdP.
Note
The Single Sign-On URL specifies where the security token is sent after you are authenticated by your IdP and is automatically populated with your Fullcast tenant ID. Depending on your IdP the corresponding fields may be labeled differently, such as Assertion Consumer Service URL and Callback URL. Refer to your IdP’s support documentation for additional information.
Copy the Service Provider Entity ID and paste in corresponding field in your IdP.
.png)
Click Next.
Configure your connection
You can choose to configure your connection automatically in Fullcast or manually.
From the Configure Connection step, select one of the following tabs and complete the steps:
This configuration is recommended as it uses the metadata URL to automatically update your singing certificate from your IdP any time it renews.
From your IdP, Find and copy the metadata URL.
In the Automatic tab in Fullcast, paste the metadata URL in the corresponding field.
.png)
If you manually configure your connection, you will have to ensure the signing certificate is manually uploaded each time it renews to maintain the SSO connection.
From your IdP, copy your Single Sign-On Login URL.
Find and download the signing certificate.
In the Manual tab in Fullcast, paste the Single Sign-On Login URL in the corresponding field.
Click Upload Signing Certificate and upload the certificate from your device.
.png)
Configure Advanced Settings
The Advanced Settings are optional, but recommended. The SAMLP and Sign Request option automatically signs the SAML authentication request.
Note
You are not required to select Sign Request and the SSO connection will still work if this is not enabled.
Expand the Advanced Settings.
Select Sign Request.
Keep the default selections in the Sign Request Algorithm, Sign Request Algorithm Digest, and Request Protocol Binding dropdowns.
Click certificate to download the certificate from Fullcast.
.png)
In your IdP, enable SAMLP and upload the certificate.
Click Create Connection.
In the confirmation window, click Proceed.
Test SSO connection
From the Test SSO step, click Test Connection.
Note
If the connection is successful, Test Successful will display.
Check the JSON displayed to ensure the correct user attributes are being passed.
.png)
Click Enable Connection.
In the Proceed to enable the connection confirmation window, click Proceed.
Configure IdP settings
Check the following configurations in your IdP which are required for SSO with Fullcast. Refer to your IdP’s user documentation for support, as needed.
Note
If the SSO configuration is not correct, the connection will not work. Fullcast does not display errors when this happens and you will need to manually check that your configuration is correct then try again.
Setting | Required value |
|---|---|
Single sign-on URL | The URL Copied from Fullcast and added to your IdP settings. |
Entity ID |
|
NameID format | NameID format—use one of the following:
|
NameID value | The user's email address. |
SAML Request Binding (Protocol Binding) value | Sent to the IdP from Fullcast. If possible, dynamically set the value based on
|
HTTP-Redirect |
|
HTTP-POST |
|
SAML Response Binding | How the SAML token is received by Fullcast from IdP, set as HTTP-Post. |
SAML Assertion and Response | The SAML assertion, and the SAML response, can be individually or simultaneously signed. |
Logout URL | This is the URL where the IdP sends logout requests and responses: |
Signed Assertions | Proceed depending on your configuration selection:
|
Logo image | Download this image to use in your SSO environment for the Fullcast application. |
