Configuring the Change Owner Sales Manager Workflow in Salesforce
This article provides directions for configuring and using Fullcast’s custom Change Owner action in Salesforce Lightning. This allows designated users, such as sales managers, to change account ownership without logging in to Fullcast.
Using Fullcast's Change Owner Lightning Action maintains the integrity of the Fullcast territory structure, while providing accessibility and flexibility for managing account moves. The feature leverages Fullcast roles and coverage assignments to control visibility and access for ownership changes.
Caution: To prevent potential conflicts and ensure a seamless experience, it is strongly recommended that you disable the standard Salesforce Change Owner button and use the Fullcast Change Owner action exclusively.
Prerequisites in Salesforce
- Salesforce Lightning-enabled
- Update to the latest Fullcast managed package, version 2.184 or higher.
- Role_Name custom metadata type updated with the appropriate role. (This determines which people appear in the Owner search.)
- Commit Flag custom metadata type updated with the appropriate selection.
Parameters
The Change Owner action provides controls on which users are eligible for account ownership, which roles/users can use the Change Owner action, and the scope and timing of the changes.
1. Account Owner Eligibility
This section defines who can be assigned as an Account Owner using the Change Owner Action.
- Owner selection is limited to active users holding a Coverage Assignment for the Role selected in the custom metadata field Role_Name.
- If you want to have multiple Roles available for assignment, such as both Account Executive and Sales Manager, then you can include both Roles, comma separated.
- If a user holds an active Coverage Assignment for a selected Role, but it is at a segment level rather than at a territory leaf node, the Account will be moved to the Unassigned node of that segment.
2. Use of Change Owner Action
This section outlines who is permitted to use the Change Owner action.
- Use of the Change Owner action is governed by segment/territory coverage assignments in Fullcast.
- To use the Change Owner action, a user must be a tenant admin or have an assignment to the segment or territory where the Account they are changing currently lives.
- A non-tenant admin user can only move accounts into a segment or territory where they have an assignment.
- Access to the Fullcast Change Owner action button can be further governed by Salesforce settings for making the button available on various layouts.
3. Scope and Timing of Owner Change
This section describes how the “Commit Flag” setting affects the timing and scope of the owner change. Setting the Commit Flag as True vs False has a big impact on how and when the owner change will occur.
- The Commit/Propose option is configured at the Salesforce instance level. Only one selection can be made and it applies universally.
- Commit (True): Changes are permanent in both Salesforce and Fullcast.
- Immediately
- The Account Owner will change immediately in Salesforce.
- The Account will move to the new territory in Fullcast.
- The Account Team will be deleted in Salesforce.
- During the Next Import/Export:
- The Account Team and Fullcast Territory Member will be updated in Salesforce
- The Account Owner field (imported from SFDC) will be updated in Fullcast.
- Immediately
- Proposed (False): Changes are proposed in Fullcast for review before finalization.
- Immediately:
- The Owner change will appear as a proposed account move to the proposed Owner’s territory in Fullcast
- The Owner will not be changed on the Account in Salesforce.
- During the Next Import/Export:
- After the proposed Owner Change (account move) is reviewed and committed in Fullcast, the change will be pushed to Salesforce.
- The Account Team and Fullcast Territory Member will be updated to reflect the account move
- The Account Owner will only be updated in Salesforce if you have a flow set up to write the account owner based on the territory assignment that Fullcast writes to the Account Team or Fullcast Territory Member.
- Immediately:
Create the Change Owner Action in Salesforce

- Access Salesforce Lightning.
- Navigate to Setup > Object Manager > Account > Buttons, Links, and Actions, and click New Action.
- On the New Action settings page, enter the action information based on the following table:
| Option | Action/Description |
| Object Name | Account |
| Action Type | Lightning Web Component |
| Lightning Web Component | fcio1:changeOwner |
| Subtype | Screen Action |
| Standard Label Type | None |
| Label | Change Owner |
| Name | Change_Owner_QuickAction |
| Description | Enter a description, such as “Fullcast Change Owner Button, where Commit Flag = True” |
| Icon |
- Click Save.
Set Up Role Name and Commit Flag in Custom Metadata
- Access your Salesforce instance and switch to Lightning if applicable.
- Navigate to Setup > Custom Metadata Types > Fullcast Policy Setting.
- In the Role Name field, enter the Role of the people who can be owners. For example AE, Sales Manager, VP, etc. Note: Separate multiple role names with commas.
- Under Commit Flag, select “true” for permanent changes, or “false” for proposed changes (default). See the Parameters section above for more information, as these options have very different impacts in Salesforce.


NOTE Commit Flag settings cannot vary by Role. The selected setting is applied globally. That is, only one action, either Propose or Commit, can be selected.
Create the Change Owner Buttons in Salesforce
Once you have created the action button, you can now add it to list views and page layouts. You will also want to disable the native Salesforce Change Owner button. Consider which users should have access to these buttons. For example, if you put the button on a view or layout that Account Executives use, they may be able to move accounts if they have Coverage Assignments to multiple territories.
Create the Change Owner List View Button
- Access your Salesforce instance and switch to Lightning if applicable.
- Navigate to Setup > Object Manager > Account > Buttons, Links and Actions.
- Click the New button or link button.
- Configure the new button settings as described in the table below:
| Option | Action/Description |
|---|---|
| Label | Change Owner |
| Name | Change_Owner_ListView |
| Description | Enter a description (optional) |
| Display Type | List Button - Display Checkboxes (for Multi-Record Selection) |
| Behavior | Display in existing window with sidebar |
| Content Source | Visualforce Page |
- Click Save.
- Navigate to the List View Button Layout.
- Click Edit and add the change owner buttons to the selected custom buttons.
- Click Save.
- The Change Owner button is now available on the List of Accounts page.
Add the Change Owner Button to Account Layout in Salesforce
- Access your Salesforce instance and switch to Lightning, if applicable.
- Navigate to Setup > Object Manager > Account > Buttons, Links, and Actions.
- Click Buttons and Links.
- From the Available Buttons section, locate and drag and drop the Change Owner button you just created to the Lightning Experience Actions section.
- Click Save.
Using the Change Owner Lightning Action
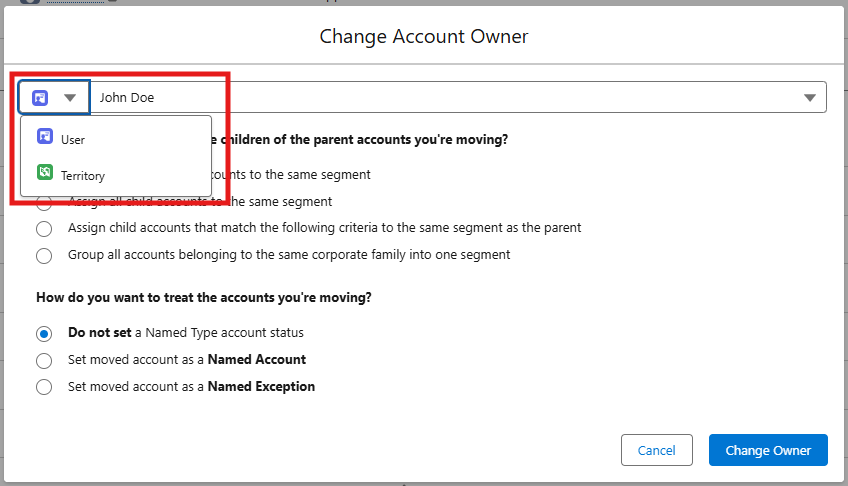
When using the change owner action you can search for owners by either user name or territory name. The names that populate in search are determined according to the parameters outlined in the Account Owner Eligibility section above.The options for treatment of child accounts and named type can not be customized.
To use the Change Owner button
- Navigate to the desired Account record.
- Locate and click the Change Owner action button.
- In the search bar that appears, you can input either a user or a territory name. Click on the icon to the left of the search bar to toggle between User or Territory.
- User (defined by the roles specified)
- Territory (limited to those visible to the user)
- Based on the information in the table below, define the behavior for child accounts associated with the parent account being reassigned. (Link to account family definitions)
| Option | Description |
| Do not reassign | Retain existing owner |
| Assign all children | Reassign all child accounts to the same new owner. |
| Assign based on criteria | Reassign child accounts meeting specific criteria to the new owner. |
| Group by corporate family | Group accounts belonging to the same corporate family for consolidated ownership. |
- Specify the desired Named Type status for the moved account.
- Do not set a Named Type
- Set moved account as a Named Account.
- Set moved account as a Named Exception.
NOTE If an account was already marked as a Named Account or Exception, the Change Owner action will still move the account and will update its Named Account status in the new territory according to the selection made when using the Change Owner action.
- Click Change Owner.
Frequently Asked Questions
Q: Can we still use the native Change Owner button from Salesforce?
A: No. You should use the Fullcast functionality to change territories so that all assignments are reflected during the next Import/Export.
Q: Can we set or change the Account Family and Named Account questions to prevent users from modifying them?
A: No. These settings are not manageable within Fullcast because they can vary for each segment or move.
Troubleshooting
Issue: Receiving the error “you do not have permission to modify”
- Verify that the user has an assignment at the correct node and is active.
- Ensure the user’s role includes the necessary permissions (read, write, etc.).
- Confirm that the account is within the assigned segments.
- Check the metadata in the Fullcast settings to ensure that the relevant roles are included.
Issue: I don’t see the Change Owner button
- The button is enabled within the Salesforce layout based on the user’s role. Ensure that the layout settings are configured correctly.
Issue: I don’t see the territory member changed on the account
- The Change Owner button only updates the account owner. All other data from Fullcast is updated during the overnight Import/Export.
- Additionally, Fullcast metadata includes settings for “Propose” and “Commit.” If the setting is configured to “Propose,” the export will not update the change until a Fullcast administrator commits the account change. Consider changing this setting to “Commit” if immediate updates are required.
Issue: I see two Change Owner buttons
- One of the buttons is likely the native Salesforce Change Owner button. If you are using Fullcast to move accounts, the native button should be disabled and removed from the layout.
Issue: I don’t see the person/territory I want to move the account to.
- Verify that you have an assignment at the correct node and is active.
- Ensure your role includes the necessary permissions (read, write, etc.).
- Confirm that the account is within the assigned segments.
- Check the metadata in the Fullcast settings to ensure that the relevant roles are included.